This article applies to Somnofy devices only. Support for Guardian H10 in the Connect app is not yet available. If you have questions about Wi-Fi setup for the Guardian H10, please contact Vitalthings Support.
Somnofy must be connected to WiFi to send sleep analyses. If the Wi-Fi network does not work for a short period, sleep data will be stored internally on the Somnofy device itself until the internet connection is up again. No sleep data will be lost if Somnofy has a continuous power supply.
Tips:-high.gif?width=267&height=475&name=WiFi%20GIF%20(Copy)-high.gif)
Are you going to connect more than one Somnofy to WiFi?
- Select App Settings in the bottom right menu bar.
- Under Predefined Wi-Fi configuration press Update.
- The pop-up that appears allows you to enter the Network Name and Password which should be the default for all devices.
- Click Save
How to configure the Wi-Fi settings:
- Step 1: Stay near the Somnofy device. In the Somnofy Connect app, select Devices in the menu bar at the bottom left.
- Step 2: Select the correct zone to bring up a list of devices located in this zone.
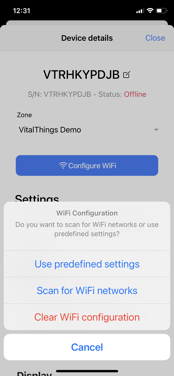
- Step 3: Now select one by one Somnofy device under Devices in the list of each zone and press Configure Wi-Fi. You get three choices.
- If you have entered the WiFi configuration from the tip you can now select Use predefined settings.
- If you want to fill in the information about another Wi-Fi network, select "Scan for Wi-Fi networks." Enter the network password and connect to the WiFi.
- To delete the device's current Wi-Fi configuration, press Clear Wi-Fi configuration.
- Step 4: When all devices show Online you are done.